36 years of Service!

Dinasaw® Bandsaw Sharpener
DESCRIPTION:
The "Dino" model PF 12v grinder is a versatile bandsaw blade sharpener capable of sharpening blades from 19 to 90mm (3/4" to 3.5") in width with tooth pitches from 8 to 38mm (5/16" to 1 1/2"). It should be used in conjunction with the "Dino" Automatic Setting Machine to maintain your blades at optimum efficiency.
Bandsaw blades suffer large stresses because they are continually flexing as they travel around the band wheels. This flexing, as well as the teeth being pulled back, causes them to develop minute cracks, especially in the gullet bottoms. Keeping them sharpened and gummed out is critical, not just to keep the cutting edge keen, but equally, to remove these cracks before they develop into serious problems.
The object of sharpening them is to remove the minimum amount of material over the whole tooth profile, while refreshing the cutting faces and maintaining a good tooth shape. A bad shape can lead to premature gullet cracking and inefficient cutting. Try to maintain smooth contours throughout the tooth profile to minimise stress raisers. Most, but not all, commercially available bandsaw blades have a "good" tooth shape.
Read these instructions thoroughly before using the grinder. Make all major adjustments with the motor switched off. When initially setting up do not run the grinder motor. This will minimise errors and unintentional damage to blades.
ALWAYS WEAR SAFETY VISOR AND DUST MASK WHEN USING THIS GRINDER!
Included with the machine are the following tools and accessories:
-
1x2.5mm Hexagonal Key (Allen Key)-Bevel Head Only
-
1x 3mm Hexagonal Key (Allen Key)
-
1x 4mm Hexagonal Key (Allen Key)
-
1x 5mm Hexagonal Key (Allen Key)-Bevel Head Only
-
1x 10-13mm spanner
-
1x Tube Spanner dog end (optional Bevel Hd)
-
1x 125mmø Grinding Wheel
-
1x Grinding Wheel Dressing Stick
-
1x AC Power Supply (Optional)
-
1x Blade Support Frame
-
3x3 Telescoping Legs
-
3x3 Telescoping Arms + Blade support posts
-
1x Power Supply Support Bracket (Optional)
-
1x Magnet
-
1x Clear protection screen
-
Fasteners

WARRANTY
Statement of Warranty
Dinasaw® Bandsaw Sharpener
LIMITED WARRANTY:
Dinasaw Pty Ltd warrants that its products will be free of defects in workmanship or material. Should any failure to conform to this warranty appear within the period of 6 months or 100 hours of operation, whichever comes first, from date of purchase, Dinasaw Pty Ltd shall upon notification of and substantiation that the product has been stored, installed, operated and maintained in accordance with Dinasaw's specifications and instructions, repair or replace, at Dinasaw Pty Ltd sole option, any components or parts of the product determined by Dinasaw to be defective.
This warranty is exclusive and is in lieu of any warranty of merchantability, fitness for a particular purpose or other warranty of quality, whether express or implied.
LIMITATION OF LIABILITY:
Dinasaw shall not under any circumstances be liable for special or consequential damages, such as, but not limited to, damage or loss or other property or equipment, loss of profits of revenue, cost of capital, cost of purchased or replaced goods, or claims of Purchaser for service interruption. The remedies of the purchaser set forth herein are exclusive and the liability of Dinasaw Pty Ltd with respect to any contract, or anything done in connection therewith such as the performance or breach thereof, or from the manufacture, sale delivery, resale, or use of any goods covered by or furnished by Dinasaw Pty Ltd whether arising out of contract, negligence, strict tort, or under any warranty, or otherwise, shall not, except as expressly provided herein, exceed the price of the goods upon which such liability is based.
The warranty period for Dinasaw Pty Ltd products is six months from date of purchase. Blades, chains, sprockets and grinding wheels are excluded from the warranty. Parts damaged through abuse are excluded from the warranty.
No transportation costs of any kind are covered under this warranty. Transportation charges to return products for repair shall be the responsibility of the customer. Returned goods shall be at the customers risk and expense.
Record your sharpeners serial number and keep it. You will need to quote this number if you require assistance or spare parts.
Your serial number is located on the inside top left corner of the rear plate.
SETUP
Bandsaw QP model - setup
Setup Grinder Operation
Dinasaw® Bandsaw Sharpener
SETUP GRINDER:
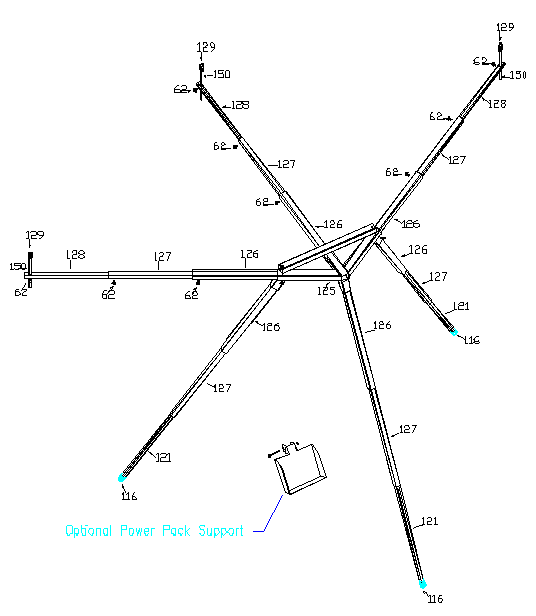
Remove the Blade support frame and all telescopic arms and legs from box. Pre-Assemble the legs (#121,126,127) and fasten to the frame. Unwrap the machine and set it on the frame with the front side facing you. Sit the machine on the blade support frame and fasten it through the slots in the front plate using the two M6 x 10mm hex head screws supplied. Unwrap the power supply and bracket and fix to the front leg of the blade support frame. At this point it is important to screw in the Knob (76) on the amplitude slide at least 19mm (3/4") to ensure the grinding wheel, when fitted, will not touch the blade.
Once you have done that, install the grind stone (note left hand thread on grinding wheel retaining nut) with it's more chamfered edge facing down. Insert the telescopic blade support arms into the "W" frame. Install the vertical blade support rods and in their extreme ends and tighten them in place with the 6 mm screws supplied.
Fit the plastic shield (115) to the cover (99) using 2 M5x10 pan head screws supplied.
GENERAL OPERATING DESCRIPTION:
The machine operates by two cams being turned on a common shaft. One cam operates the feed mechanism through an adjustable linkage, while the other oscillates the grinding head in unison. The timing of these operations produce the tooth shape.
The feed cam (6) is fixed to the camshaft which when rotated, moves the cam follower (33) whose movement is magnified through a translator arm (38) to reciprocate the feed block (45). This reciprocating action is transferred to the tooth picker (59) via a feed arm (52). The actual tooth position is determined with adjusting screw (46-47) so that it should place the face of the tooth to be ground immediately in front of the grinding wheel. It then returns into the gullet of the proceeding tooth and begins to move forward again. After the face has been ground, but just before the wheel has reached the bottom of it's travel, the picker engages the face of the preceding tooth and begins moving the blade forward allowing the wheel to grind through the profile of the tooth. As the blade moves forward, the wheel at first travels down into the gullet and then rises up as the back of the tooth. After grinding the tooth back, the wheel continues it's rise and clears the tooth. The picker continues pushing the tooth so as to place the front face of the next tooth under the grinding wheel to begin the cycle over.
The manual is set out under the following headings and should be understood before using the grinder.
-
Fitting the blade to the sharpening machine.
-
Feed pawl adjustments and Grinder feed speed.
-
The grinding wheel maintenance.
-
Centering the Grinding Wheel.
-
Machine adjustments to follow tooth profile required.
-
Bevel Tooth configuration. (Optional)
-
Hi point Tooth configuration. (Optional)
-
Maintenance.
Please note that ultimate tooth shape is a function of (2), (3) and (4) and alterations to any of these will modify tooth shape.
When first setting up bevel head machines it is recommended to disengage the beveling facility by removing the Idler Gear (B36) from engagement which is retained with a pan head screw through a slot in the rear plate. Turn the cam/gear (B23-B24) by hand until the cam follower (B27) rests at its central position with the head square. (See Bevel Head annexure)
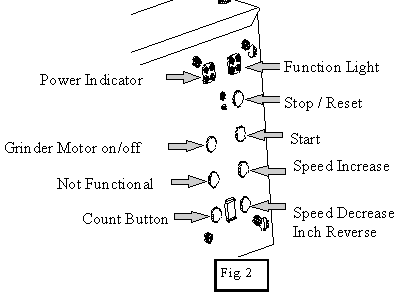
CONTROL PANEL
Bandsaw QP model - control panel
Control Panel Functions
Dinasaw® Bandsaw Sharpener
AUTOMATIC MODELS ONLY:
First connect the power supply to the grinder making sure that the polarity is correct. With the power switched on the green indicator light should glow and the red function light should be off. To make setup adjustments use the Inching buttons, these will feed the blade at a speed determined by you. Once setup adjustments have been made, press the Stop button.
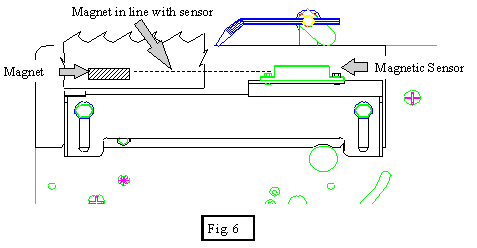
If you wish to sharpen your blade only once then place the magnet on the blade so that it will pass directly in front of the magnetic reed switch (see Fig. 6), then press the start button followed by the Grinder button. This will only allow the magnet to pass the reed switch once. To sharpen your blade more than once, place the magnet on the blade as described before, press Stop / Reset (this will clear all previous instructions), press the Counter button the required number of times you wish to sharpen your blade.(eg: press button 5 times and the magnet will pass the proximity switch 5 times). The display will confirm how many times you press the button. Once you have done this press "Start" then "Grinder". The sharpener has been programmed to start at a slow speed with the grinder motor off to minimise accidental damage due to incorrect setup.
To alter the feed speed of your machine when in run mode (ie. Both red and green lights on) press the "Inch Fwd" or "Inch Rev" buttons.
To only turn the grinder motor on press "Stop" then "Grinder".
The control module has a built in protection feature which will shut down the unit in the event of a mechanical or electrical failure. Once the module has shut down a two to three minute "cool down" period is required to allow the module to reset. Do not operate the machine immediately after it has automatically shut down.
When the machine is in run mode (ie. Both red and green lights are on), the feed speed may automatically alter. This is a normal feature of the controller. If the module senses any excess load on the feed motor (kinked or gummed blades), it will automatically adjust the speed to compensate.
For manual sharpeners, only turn the handle in a clockwise direction.
FITTING THE BLADE
Bandsaw QP model - fitting blade
Fitting Blade To Sharpener
Dinasaw® Bandsaw Sharpener
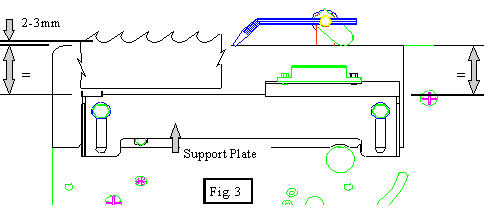
BLADE FITTING:
The saw blade is held in position against the rear of the Sharpener by 4 magnets, while three flat magnets are fixed to the top of the adjustable support plate. (see Fig. 3)
These hold the back edge down. Three telescoping arms support the rest of the blade on 3 plastic guides. (see Fig 1)
Set the height of support plate so the bottom of the tooth gullets clear the top of rear plate by approximately 2-3mm, ensuring the support plate is parallel to the top of the grinder.
The telescoping blade supports must hold the return of the blade "comfortably" without trying to lift the blade off the support plate or push it too far out of shape. (See Fig. 4 &5)
Rusted, gummed or kinked blades will not travel smoothly and will have to be cleaned or repaired before sharpening.
The magnetic sensor switch sits on top of the support plate. Placing the magnet supplied on the inside face of the blade will stop the machine when the magnet presents next to the sensor. This switch is fragile so use care when fitting or removing blades.

FEED PAWL ADJUSTMENT
Bandsaw QP model - feed pawl adjustment
Feed Pawl Adjustments
Dinasaw® Bandsaw Sharpener
ADJUSTING THE FEED PAWL:
The Feed Picker (59) height must be adjusted to place the picker as far forward into the front face (hook) of the tooth as possible. This ensures the picker does not have the opportunity to catch in the gullet or high up the face of the tooth, causing irregular tooth placement to the grinding wheel. The height of the picker is set by loosening the Clamp bolt (55) and turning the Height Adjuster Tab around so it rests on the top of the rear plate while presenting the tooth picker at the correct height into the tooth. Additionally a pawl guide is positioned below the Pawl Arm (52) to minimise sideways movement. Loosening it's retaining bolt, which then allows the guide to be turned to a position to capture the pawl arm when in it's lowest position. It is generally preferable that the Feed Pawl Block (45) moves evenly over an arc either side of vertical. To achieve this may require the picker protrusion from the clamp to be lengthened or shortened relative to the Feed Pawl Arm (52).
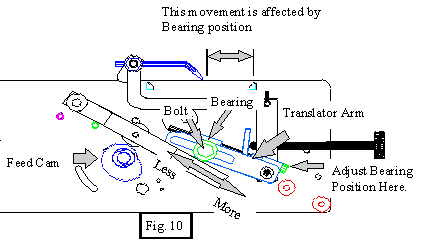
The Feed Pawl Tooth Stroke must be set to the pitch of the teeth. The teeth are indexed by means of an oscillating mechanism actuated by a Feed Cam. The amount of movement (oscillation) imparted by the cam is governed by the position of the Bearing along the slot of the Translator Arm.
Shifting the bearing (34) left (towards the cam), decreases the total movement (oscillation) while moving it right (away from cam) increases this movement.
The bearing (34) is secured to the Translator arm by a bolt (32), which in turn is adjusted along the Translator Arm with a 5mm screw thread (64) actuated with a 4mm Hex. Key. Loosening the bolt and turning the socket screw allows accurate adjustments to the bearing position to be achieved. A good starting point is to have the picker return half way (50 to 60%) into the next tooth. For example, a 25mm (1") pitch blade will require a total stroke of 38mm (1 1/2") Increasing the tooth stroke allows the grinding wheel to go further down the tooth face before the picker contacts the next tooth and moves the blade along. This lengthens the face and gives a smaller radius to the throat (transition between the front face and the gullet).see Fig. 12
TERMINOLOGY
Bandsaw QP model - terminology
Blade Terminology
Dinasaw® Bandsaw Sharpener
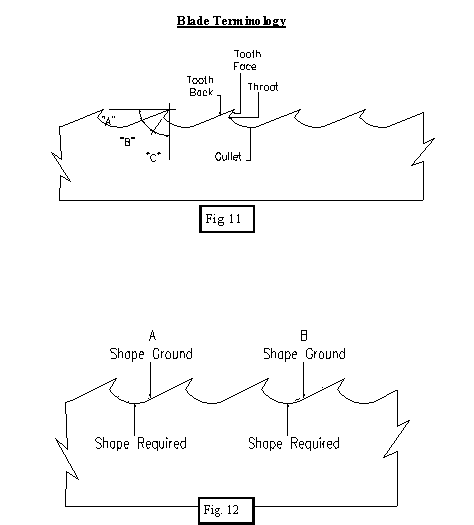
TERMINOLOGY:
A) Increase Stroke -- (move bearing away from cam)
B) Decrease Stroke -- (move bearing towards cam)
DRESS GRINDING WHEEL
Bandsaw QP model - dress grinding wheel
Dressing the Grinding Wheel
Dinasaw® Bandsaw Sharpener
DRESSED GRINDING WHEEL:
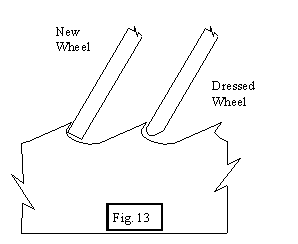
When new, the Grinding wheel has a square edge around the rim, which must be dressed to a shape, which will conform to the tooth shape. This is done with the dressing stick supplied by holding it against the rotating wheel.
Before commencing the wheel dressing procedure be aware that a large quantity of grinding dust can be released and it is most important that suitable face protection and a dust mask are worn. Grinding wheels are brittle and run at high speed and inhaling grinding dust may cause some severe respiratory diseases. Treat grinding operations as always potentially dangerous. Do not use chipped or cracked wheels.
Raise the grinding head to the upright position and fit the grinding wheel (107) to the motor spindle (91). Note the left-hand thread on the knurled retaining nut (93). Check the wheel is secure and rotate by hand ensuring it spins true. Fit the bottom guard. Press the "Grinder" button being aware that at this stage, the integrity of any new wheel is unknown and should always be regarded as suspect until it has operated at speed for at least one minute. During this initial "run in" stage, stand behind the wheel guard with no bystanders around and do not touch the wheel with the dressing stick.
When satisfied of the wheel's integrity, hold the dressing stick against the wheel's periphery so as to dress a radius on the corners of the grinding wheel. Slightly more material should be removed from the outer lower edge (away from motor) as per Fig.13. This will approximate the final wheel shape which should hold form throughout its life. The grinding wheel will require periodic dressing to refresh the cutting grit. The form which the wheel takes should be maintained as long as the grinder is used for profiling the whole tooth and not just the tooth face or back individually.
When a new wheel is installed on the grinder, it may require shaping. If it does not require shaping, it still may need to be trued. Truing the wheel ensures that it is perfectly round, as it is centered on the arbor. This is necessary to eliminate vibration. Both truing and shaping are done with the dressing stick that is supplied with the grinder. Replacement dressing sticks are also available from your dealer. Diamond tipped dressers are also available.
The shape of the wheel will affect the shape of the tooth being ground. Due to the unique design of the Dinasaw Profiler, the wheel shape is ultimately a function of the cams, as it wears evenly over all contact areas. If you are trying to change the shape of a tooth profile (i.e. increasing the hook angle), you will find that the wheel will wear more in one area and will have to be dressed as a result. The wheel shape should look like that in Fig. 13.
SETTING THE GRIDING HEAD
Bandsaw QP model - set grinding head
Setting the Grinding Head
Dinasaw® Bandsaw Sharpener
CENTRING THE GRINDING WHEEL:
It is important the grinding wheel is aligned precisely on the centerline of the blade. The method used is to rotate the grinding head about the retaining axis, which connects the grinding head to the motor arm. The procedure varies between the standard straight sharpener and the beveling model but the principle remains the same.
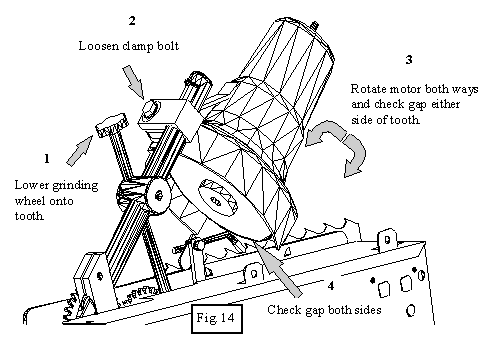
Standard Model Slightly loosen the 8mm retaining bolt (85) which fastens the plastic motor shroud (84) to the motor arm knuckle (82) to enable the head to be rotated about this axis. Index the blade through until the back of an unset raker tooth is directly beneath the grinding wheel.
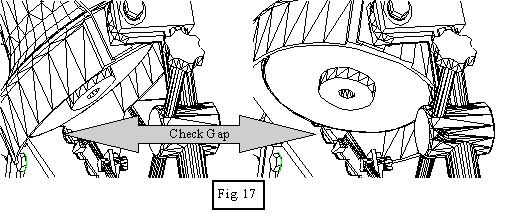
Lower the grinding head close to the back of the raker tooth and rotate the head through about 20° either side of centre and note the gap left between the wheel and the tooth back. Should more gap show when tilted towards the operator (front) side, then the head will have to be moved away from the operator or vice versa.
ALIGNING THE GRINDING HEAD:
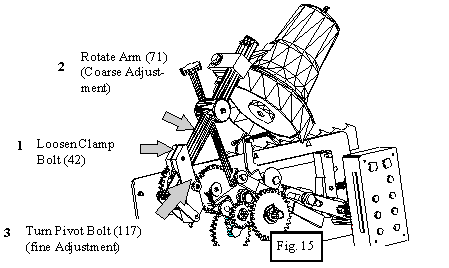
Step 1:
(1) An initial coarse adjustment is made by rotating the motor arm tube (71) about its retaining hole in the motor arm pivot block (120). This is done by loosening the 6mm clamp bolt (42) in the pivot block (120) and twisting the motor arm until the gaps left between the wheel and the tooth back are approximately even on both sides (within 1mm). See Fig. 17. Reclamp the motor arm clamp bolt (42).
Step 2:
The fine adjustment is made by turning the pivot bolt (117) with the 13mm spanner. See Fig. 15. This moves the whole assembly across along the bolt's axis. Turning the bolt clockwise moves the assembly towards the operator (front). This screw has only limited adjustment. Continue to check the gap and make this adjustment until satisfied that the gap remains exactly the same between both sides when the head is tilted.
Step 3:
Bring the grinding head back to square and tighten the 8mm head retaining bolt.
BEVEL HEAD MODEL:
The head on this model is able to be rotated about the securing axis without loosening the 8mm head retaining bolt . This is achieved by first removing the plastic plug which seals the end of the motor arm. This exposes the head of the M6 socket cap screw and the top of the worm rack.
(1) Fit the dogged end of the 16mmø (5/8"ø) tube spanner to engage the slots in the end of the worm rack and pass the long end of a 5mm hexagonal key through it's center and loosen the
M6x70 socket cap screw. Turning the tube spanner enables rotation of the head about it's retaining axis. See Fig. 16.
TO MOVE THE GRINDING HEAD:
Step 1:
An initial coarse adjustment can be made by rotating the motor arm tube about its retaining hole in the motor arm pivot block. This is done by loosening the 6mm clamp screw in the pivot block (B21) and twisting the motor arm until the gaps left between the wheel and the tooth back are approximately even on both sides (within 1mm). Reclamp the motor arm. See Fig. 15.
Step 2:
The fine adjustment is made by turning the pivot bolt with the 13mm spanner which moves the whole assembly along the bolt's axis. See Fig 15. Turning the bolt clockwise moves the assembly towards the operator (front). Continue to check the gap and make this adjustment until satisfied that the gap remains exactly the same between both sides when the head is tilted. See Fig 17.
Step 3:
Bring the grinding head back to square with the tube spanner and retighten the M6 socket cap screw .
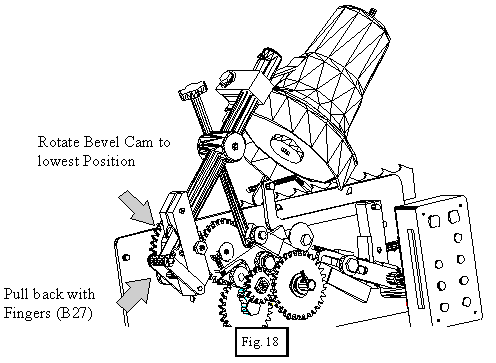
It is also possible to rotate the head by moving the bevel cam follower (B27) into the depressed lobe of the cam and using two fingers, move the cam follower out to actuate the bevel head while checking the gap between the tooth back and the wheel. See Fig. 18.

ALTERING TOOTH PROFILE
Bandsaw QP model - altering tooth profile
Altering Tooth Profile
Dinasaw® Bandsaw Sharpener
ADJUSTING FOR TOOTH PROFILE:
Dinasaw Sharpeners are capable of following many tooth profiles. The profile made by the sharpener is a result of (a) Tooth stroke (b) Cam timing (c) Grinder head Oscillation (amplitude) and (d) Wheel shape. The first three are adjustments that are made to the machine while the fourth is either a function of wear or a result of wheel dressing.
Three types of cams can be supplied with the machine. The "C" type cam is the most common and is used on skip, straight back teeth blades such as Simonds Red Streak® or Lennox Wood Master®. The "A" type cam is used for a tooth form having a convex back with lower clearance angles while the "U" type cam is made from steel and will sharpen straight shaped blades.
(a) The Tooth Stroke of the feed pawl, as mentioned previously, has an effect on the transition between the tooth face and the gullet (throat) and is adjusted by moving the bearing along the translator arm with the screw adjustor turned with the 4mm Hex Key (Fig.19). Moving the bearing forward (away from cam) increases the stroke of the feed pawl. This effectively gives more time for the grinding wheel to move down the face of the tooth before it is moved away. The throat of the tooth will have a tighter radius the longer the stroke becomes. See Fig. 19. A good starting point is to adjust the stroke to allow the picker to return 50% into the next tooth before beginning the advance. (say 28mm (1 1/8") total stroke for a 19mm (3/4") pitch)
When the tooth stroke is varied, it changes the tooth position in relation to the grindstone. Lower the grinding head and adjust the tooth position screw (Fig.19), so that the grinding wheel passes very close to, but does not actually touch the tooth face. Remember that the blade has to be advanced one tooth to see the effect of the tooth position screw adjustment.
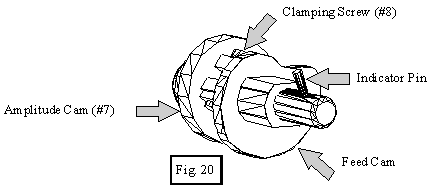
(b) Your grinder has the facility to allow the tooth shape to be varied by adjusting the cam timing. The standard timing produces a smooth progression from the tooth face into a well-rounded gullet. This may be altered by loosening the clamping socket set screw in the grinder head cam(7) and altering its timing with the feed cam. See Fig. 20. Advancing the grinder head cam (7) (turning clockwise) moves the gullet bottom closer to the tooth face while also deepening the tooth. When altering the cam timing, do so in small increments. Cam timing is critical and a few degrees will drastically change the shape of the tooth.
Before you attempt to adjust the cam timing, make note of where the timing is set. This is gauged by the relationship between the clamp socket cap screw and the indicator pin in the near side if the camshaft. Press the inch button until the clamp screw (#8) in the amplitude cam (#7) is exactly vertical. Now look at where the indicator pin on the camshaft is pointing. Most blades require the indicator pin to be around 120 to 150 degrees with the clamp screw vertical. To retard the timing, loosen the clamp screw in the amplitude cam (#7) and turn the cam anti-clockwise with the allen key. Tighten the clamp screw and press the inch button to see if you have achieved the desired results. Better access is gained to the socket cap screw if the cam follower is raised clear. Remember to remove the allen key and lower the follower to it's working position before using machine. Advancing the cam deepens the gullet and moves it towards the tooth face. Retarding the cam has the opposite effect. As a consequence of moving the cam timing, the tooth height (amplitude) may have to be adjusted.
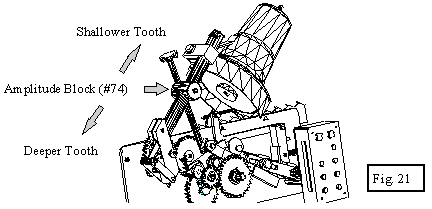
Grinder Head Oscillation (Amplitude) has the effect on total tooth depth (height) and is adjusted by sliding the Amplitude Block (74) either up or down the motor arm (71). Moving the block towards the motor will decrease the arc through which the grinder head moves. The block is secured to the motor arm by an 8mm socket set screw. Do not confuse this adjustment with that performed with the knob (76) which sets the height of the grinder head. Moving the amplitude slide will require the height adjuster knob (76) to be readjusted. To help reference the position, the motor arm is marked with transverse lines (See Fig. 21)
The Amplitude screw will need to be adjusted in if the amplitude block is moved towards the motor. Failure to do this may result in damage to the blade and/or grinding wheel due to excessive grinding.
Remember the depth adjustment screw (75) will not directly affect tooth shape, but merely raise or lower the head to ensure the wheel can reach the tooth, therefore, adjust it so that the wheel is close to the tooth at some stage of its cycle.
If the wheel misses the gullet bottom, but touches the tooth back, greater depth is required. Loosen the setscrew and move the amplitude block (74) away from the pivot point of the amplitude cam arm (71) (i.e. away from the grinding head).
If the grinding wheel touches the bottom of the gullet but misses the back of the tooth, less depth is required. In this case, the amplitude block (74) is moved towards the pivot point of the amplitude cam arm (71) (towards the grinding head). This will lower the whole head, so you will need to raise it with the depth adjusting screw (75) to avoid damage to the wheel by dragging it hard over the tooth.
General Notes:
*The grinding process tends to leave a burr on the inside edge of the ground surface. This is best removed with a sharp steel edge such as a knife being drawn around the blade while still supported by the sharpener frame. Exercise care not to damage or dull the teeth during this process.
* If setting up the machine for a permanent installation, allow ready access to the underside of the machine for general maintenance of the machine.

TROUBLE SHOOTING
Bandsaw QP model - troubleshooting
Trouble Shooting
Dinasaw® Bandsaw Sharpener
FAULT FINDING (GENERAL):
ERRATIC GRINDING:
Symptom Solution
-
Loose feed assembly Tighten pivots (72)
-
Dirty or bent blade Clean or straighten
-
Blade not sitting down Adjust blade support legs
-
Picker not presenting Adjust Picker guide (57) correctly
-
Motor shaft play Adjust end float screw (95).
Do not preload.
GRINDER VIBRATES:
Symptom Solution
-
Wheel out of balance Dress wheel
-
Motor bearings worn Replace motor
-
Motor shaft play Adjust end float screw (95).
Do not preload.
MOTOR ARM LOOSE:
Symptom Solution
-
Loose pivot (72) Tighten cone point pivots
-
Pivot bolt loose in thread Tighten socket set screws (40)in motor arm pivot block.
-
Excess play in worm rack/gear Adjust offset sleeve (bevel head only)
BURNT SAW TEETH:
Symptom Solution
-
Grinding too heavy Adjust for lighter cut
-
Wheel loaded Dress wheel
-
Feed too slow Use higher feed speed.
GRINDING UNEVEN:
-
Adjusting screws loose. Tighten bias threads (49 & 78) against screws through sides of respective blocks.
GRINDER HEAD MOVES ERRATICALLY:
-
Contact points Dry. Apply small amount of grease to top of cam followers.

MSA OPTION
Bandsaw QP model - MSA option
MSA Option
Dinasaw® Bandsaw Sharpener
MSA PROFILER (OPTIONAL):
The MSA Profiler has the ability to tilt the grinding head 10°, both left and right, at selected points in the grinding cycle.
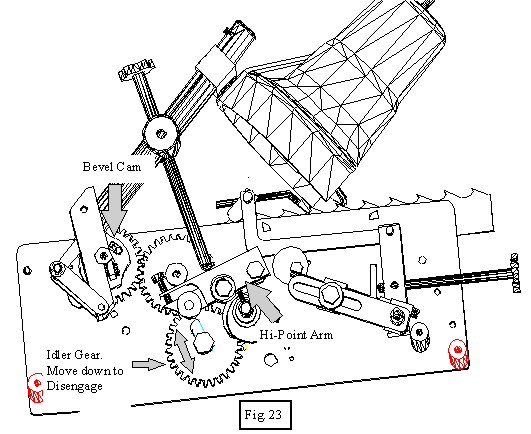
This is achieved by a cam driven with a series of gears off the amplitude cam(7). The head is actuated via a cam follower and conrod to a worm style rack sliding inside the motor arm. This engages a gear segment connected to the grinding head. The connection between the gear segment and the grinding head relies on the tightness of the 8mm retaining bolt to "sandwich" all the components. The driver gear train and cam may be disengaged by moving the idler gear (B36) down its slot. See Fig. 23. This reverts the machine to perform standard, straight grinding.
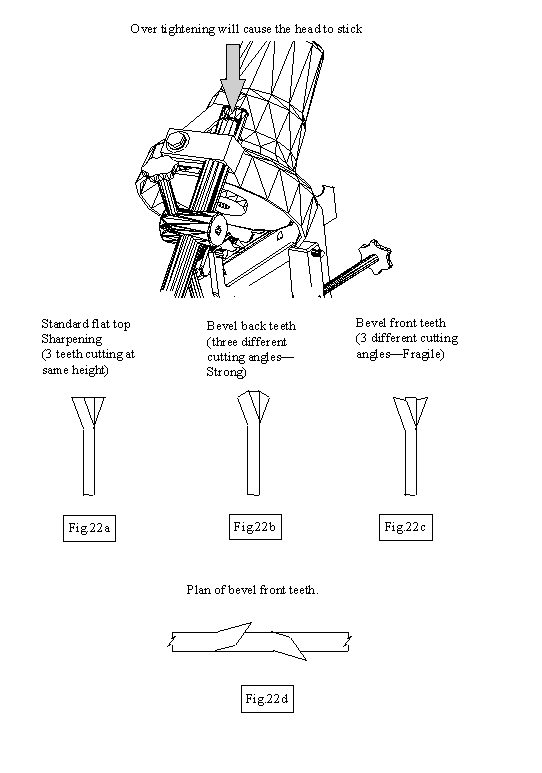
Generally it is preferable to angle the backs of the set teeth away from the centerline to increase the shear angle at the outside edge as shown in (dia.7b) This produces a more substantial tooth form which holds an edge longer and is less liable to brittle fracture than standard, flat ground teeth (dia.7a), Additionally this bevel form tracks straighter and is less sensitive to setting errors.
Another option which works well in soft, fibrous woods is to apply a positive angle across the front face of the set teeth, section view (Fig.22c) & plan (Fig.22d), giving the set teeth a very keen outside edge to better sever the wood fibres. This option does not hold its edge as long as (fig.22b).
A further benefit is obtained in beveling the teeth as the grind marks on the tooth face and back produced by the grinding wheel are no longer parallel but oblique to one another. This further reduces the chance of brittle fracture at the tips.

SET BEVEL OPTION
Bandsaw QP model - setting the bevel option
Setting Up the Bevel Option
Dinasaw® Bandsaw Sharpener
SETUP FOR BEVEL GRINDING:
The point at which the grinding head tilts is determined by the timing between the amplitude cam and the bevel cam. It is simply a matter of replacing the idler gear (B36) into the gear train at the correct point in the grinding cycle. The bevel is designed to occur alternatively for 2 out of every 3 teeth to accommodate a "raker" style setting pattern.
The sequence which the head bevels {right-left-straight (standard) or left-right-straight (occasional)} is determined by the orientation of the bevel cam (B23). Noting the positioning of the cam lobes with regard to the anti clockwise cam rotation checks this. Right-left-straight occurs when high lobe is followed by the depressed lobe in the anti clockwise rotation. The bevel cam is fixed to it's drive gear (B24) by 2xM3 cap screws and removing these allows the bevel cam to be taken off and turned around so that it's opposing side is out allowing it to perform the other bevel sequence.
This requires the motor arm assembly to be first removed. Loosening the M8x20mm cone point socket set screw (72) in the front plate will free the entire motor arm assembly allowing access to the cam. Remove the two retaining M3x10 socket set screws and fit them into the counter bored slots in the other side. Replace the cam and motor arm assembly. The bevel cam has provision for minor timing changes to be made by loosening the M3x10mm socket set screws and rotating the cam around the slots. This allows the timing increments to be finer than the pitch of the gears would normally achieved.
Set the timing in the following manner:
* With the idler gear removed, press the Inch Fwd button until the grinding wheel is positioned at the point where the bevel is required.
* Turn the gear/cam assembly anti clockwise by hand until the follower bearing moves
into depressed lobe of the cam. This tilts the head away from the operator. Note there is a 15° dwell on the cam so take this into account during timing. Teeth beveled on the back require the cam timing set so that the head has just tilted as it reaches the top of the tooth (retarded) while teeth beveled on the front face require the tilt to be completed as the grinding wheel finishes the face and enters the gullet (advanced).
* Ensure the grinding wheel is still at the point where the bevel is required and the bevel cam is correctly positioned with the cam follower in the depression, then move the idler gear (B36) and tighten with the M6 pan head screw through the slot in the rear plate so that the gear completes the gear train.
Note: The bevel cam/gear rotates anti clockwise and there is a 15° dwell. Failure to take account of this dwell with regard to where the bevel is to be applied will result in the head being tilted in the gullet.Further minor adjustment is the made by loosening the 2 screws retaining the cam to its driven gear and rotating cam until the exact timing is obtained. Re tighten the cam retaining screws.
The grinding head alternatively bevels twice every three teeth and it is important to ensure that the tilt sequence and direction corresponds to the setting sequence of the blade. Blades are normally left - right - straight but sometimes right - left - straight teeth are encountered. This requires the Bevel Cam to be removed from the driven gear and inverted as described previously.
Before beginning to sharpen blades, it is important that the grinding wheel is centered (as previously described) and the head is free to rotate.
With a blade fitted to the machine and the head suitably timed for the blade (either the front or back of the tooth to be beveled), inch the machine until the grinding wheel has reached it's full tilt (either side) at the appropriate point along the tooth profile and lower the grinding head until the wheel just touches the tooth. Index the machine until the head bevels at the same point on the alternate tooth. Check the gap distance between the wheel and the tooth to ensure the wheel is centered.
The head tilt is controlled via a push rod in the middle of the motor arm. This axial motion is transferred to tilt the head through a reciprocating worm rack engaging a segmented gear attached to the head pivot.
To ensure smooth operation, it is important that the backlash between the rack and the gear is eliminated without any preloading, which may cause the movement to stick. Adjusting this backlash is achieved by rotating the eccentric bush (B6) around the motor arm (B17). Loosen the M3x6 retaining screw (B4) and using it as a lever, move it within the arc allowed by the slot. Moving the screw in the slot towards the operator removes the backlash. Tighten only enough to remove excess movement and then retighten the screw.


PARTS DIAGRAM


Bandsaw QP model - electrical circuit
Electrical Circuit
Dinasaw® Bandsaw Sharpener
ELECTRICAL CIRCUIT:

BEVEL HEAD PARTS DIAGRAM
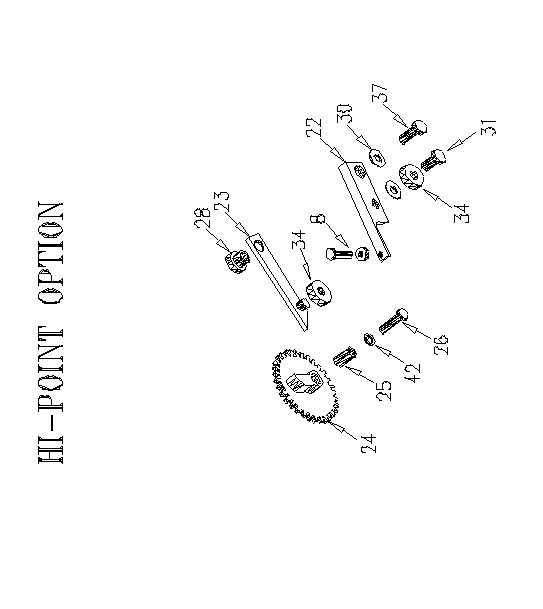
Bandsaw QP model - bevel head parts diagram
Bevel Head & Hi-Points Parts Diagram
Dinasaw® Bandsaw Sharpener
BEVEL HEAD & HI-POINTS PARTS DIAGRAM:
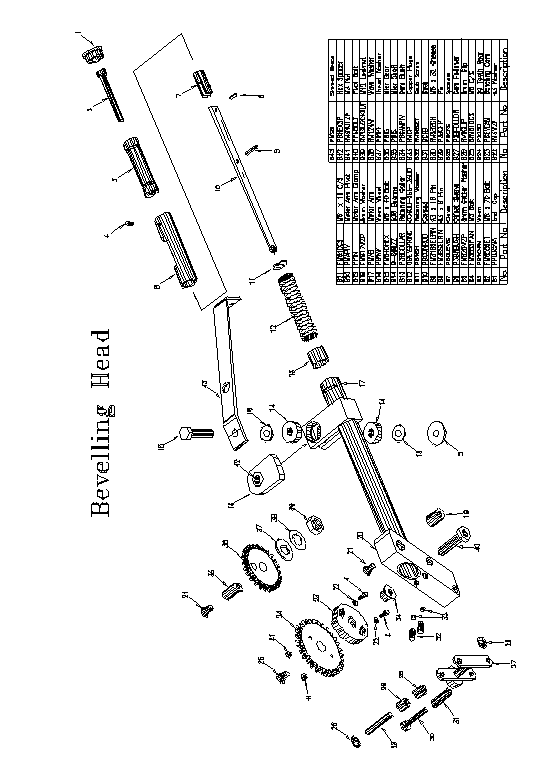
PART NUMBERS


MAINTENANCE SCHEDULE
